
 |
 |
|
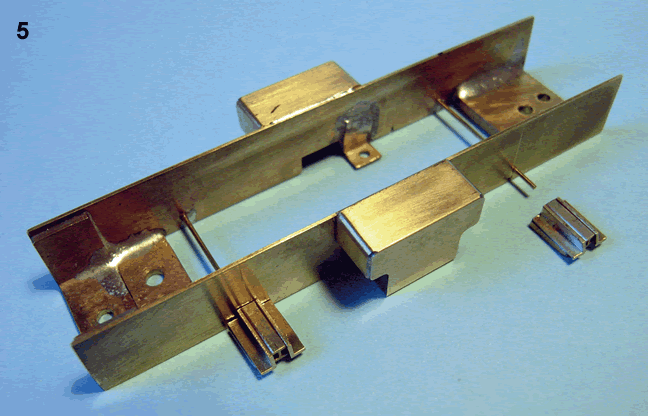
| 4. The lifting points are shown here upside down. They are a tiny but essential feature. They are made from H- and L-section brass, mounted on a piece of 0.8mm brass. 5. The lifting points are soldered to the frames, using a brass wire through the frames to help locate and strengthen the joint. |
||
| When these are removed the power unit can be lifted out of the chassis for future maintenance. Although the power unit protrudes a little into the cab, it does not sit higher than the bottom of the cab windows, so the cab is quite unobstructed and once a crew is fitted the motor is hardly seen. (The crew, of course, will need to be careful of that drive belt!) With the bare frames assembled, detailing commenced. The shape and dimensions of the fittings on the frames were all taken from the available drawings and checked by reference to photos, but they are not described in complete dimensional detail here. The Worsley kit includes the fuel tanks and sandboxes. As the fuel tank occupies the full width between the frame and outside edge of the footplate on each side, it was convenient to fasten this to the frame at this stage. The sandboxes being narrower were mounted on the underside of the footplate since they stand proud of the frame. Lifting points |
will sit just below the outside edge of the footplate. For added strength, and accuracy of positioning, a piece of 1mm brass wire was fitted across the frames at the correct locations, and the lifting points were slid onto these and then soldered. (The rear wire is subsequently removed between the frames to allow insertion of the power unit.) A supporting web was then added centrally under each lifting point. At this point I checked to ensure that the footplate was a comfortable fit onto the frames/fuel tank/lifting points assembly. Steps and brake cylinder supports
|
6. A web piece is fitted centrally under the lifting points, slightly inset, with the edge angled inwards towards the bottom. |
|
7. The bracket for a brake cylinder is shown in place, with a hole in the centre where the brake cylinder will be mounted. The end steps are made as a single unit to provide correct spacing and added strength. The joining section between the two steps is filed back a little so it will be less visible. 8. The stiffener which joins the steps to the lifting point support was simplified somewhat for the purposes of the model. It sits below the brake cylinder support. |
||
 |
 |
|
| 802 | CONTINENTAL MODELLER | |
| Next Page | ||
|
|
||
